
This is a summary of the experience I had trying to Photograph the elusive yet magical Aurora Borealis in Tromso. Please bear in mind I am no scientist or expert in this subject but am a professional photographer by day. I have put this together as I found it difficult to find one resource that gave me the information I needed for my trip and to help fellow photographers who may be planning a similar visit in the near future.
I travelled to Tromso on 2nd January 2014 and stayed for 5 nights.
I researched where in the world would be a good place to view the Northern Lights. There are a few countries in Europe on the list, Iceland, Sweden, Finland and Norway to name a few. I decided on Norway due to the fact that there was more scope to travel if the weather was against me and percentage sightings of the Northern Lights seemed to be high compared with other destinations.
FLIGHTS
There wasn’t much choice and the cheapest seemed to be from Heathrow on SAS. This involves a stop in Oslo before an internal flight onto Tromso itself. The flights cost around £350 return and I made a slight mistake of picking flights that left only 1hr 20mins at Oslo. I say mistake because although that sounds great, Oslo often has poor weather in the winter (snow) and I suffered an hours delay to take-off due to it snowing heavily in Oslo. The flight itself takes around 2 hours but thanks to a following jet stream, flight time was reduced to 1hr 35mins. This left it tight and SAS weren’t going to hold the ongoing flight to Tromso for me! I made it, just, but mainly because the onward transfer was delayed by 15 mins. Be aware that currently, Norwegian customs do not operate in Tromso and I therefore had to claim my hold luggage in Oslo, check my case back in (in the normal way) and go through all the security gates and passport control again as if I was travelling from Heathrow to Oslo only. There were no transfer arrangements as normally happens with a short stop-off and being with the same airline. This left me even less time. Luckily, there were no queues at check-in or security and I sailed through with minutes to spare. SAS keep baggage check-in open until 20mins prior to flight take off time. In hindsight, it would have been more sensible to get an earlier flight and have a more relaxed stop over in Oslo (around 5 hours). There are direct flights on Norwegian Air from Gatwick but the prices were higher and flights less frequent. Flight time to Tromso from Oslo is also around 2 hours.
Tromso is a small airport and although I arrived at around 1am there were plenty of taxis around to pick everyone up. The airport is merely a 10min drive from the main centre of town and cost about £25 even at that time.
ACCOMMODATION
I chose an Hotel to stay in for several reasons. Firstly resources, a large Hotel is central, has room service, breakfast and information readily available. As I was going to be somewhat of a night owl, these things would be important. Free and reliable Wi-Fi was also essential to enable the hourly updates on weather and Aurora activity. Cost differed little from apartments and I chose the Radisson Blu on the harbour front as it was located well, had free reliable wi-fi, is large and generally has good reviews. The rooms all over town in most hotels are reportedly small (unless your budget stretches to a suite!) but it was comfortable and cosy enough for my requirements. Cost was around £100 per night including breakfast. The breakfast was vast with a huge choice to suit every dietary requirement. It was also available from 7am until 9:30 weekdays and 7:30 – 10:30 on weekends.
LANGUAGE
Everybody speaks Norwegian (no surprise there) but slightly unexpectedly, everyone also spoke English. Fluently. Embarrassingly, I didn’t even get to learn ‘Hello’ in Norwegian as I didn’t have to. I always feel massively guilty when this happens but that’s just the way it is there.
TROMSO
The town itself is quaint, functional and I grew quite attached to it although I can’t say I did too much sightseeing. There seems to be plenty to do if you aren’t simply staying as a stop-over to explore the region in search of the Aurora. It is large enough but not too large it loses its identity and has a population of approx 73,000 which is smaller than Worcester or Chester in the UK.
People there get on with their lives with the minimum of fuss. Everyone I met was friendly, helpful and took time to chat if I wanted to. I never once felt ‘uneasy’ walking around late at night in the city and I can honestly say it was one of the most relaxed comfortable places I have ever visited. If there is crime there (and I am sure there is) I didn’t come across any hint of it at all. As normal, be sensible and aware but certainly no more than you would be in the UK and probably much less!
FOOD
Everything in Norway is expensive! That means everything. Get over it or begrudge every penny (or pound) you spend there. A cup of tea and a muffin cost £7.50. One Burger King Chicken Burger meal (standard size) around £12. A pizza in a large restaurant with a fizzy orange £26. Some of the restaurants a good three course meal would easily have cost £40 without drinks. It startles at first but you quickly realise that this is just the way it is for everyone in Norway and you are not being ripped off as a tourist. It is just very expensive there as it is in most Scandinavian countries. Food choice is fairly wide but there does seem to be a large number of burgers and pizzas around. There are Thais and Indians etc but I didn’t try so can’t pass judgement. I was there for the Lights, not the food. Everything I ate was as you would expect and the pizza at Peppe’s delicious!
Given the large breakfasts, I didn’t require too much else and in fact, often skipped a meal during the day as I found I didn’t need one.
Supermarkets are around in town where you can buy all the normal snacks etc as I did to quell the night time hunger pangs during the Aurora chases!
MONEY
As stated, everything is expensive in Norway. Norwegian Kroner is the currency and currently the exchange rate is around 10NK to £1. This makes conversion easy. I took £150 worth of currency but cards are pretty much accepted everywhere, even in the Taxis so no need to carry wedges of cash around.
AURORA TOURS
I didn’t know the area at all and so decided that on the first night I would book a “Northern Lights Chasing” tour to help orientate myself. There are quite a few available and they promise to dash all over Norway in search of the lights. I picked one that claimed to be run by professional photographers that would take you to the most ‘scenic’ spots for photographic excellence. However, in reality, it was a tour for people that wanted to take pics that had less understanding of their cameras. The guides offered valuable basic help with settings and gave out tripods etc. I think I was looking for a better idea about locations than I was settings etc but I did manage to glean some valuable information on where they visited and how they ‘read’ the weather and aurora forecasts.
Tours generally cost around £100 – £140 per head. Be aware that the cheaper end of the market then require additional fees for hot food (you might need it) and sometimes warm clothing and tripod hire etc. I paid £135 all in and got a snow suit, snow boots with crampons and a head torch. I booked with http://chasethelighttours.co.uk and Marianne and George were very helpful. Unfortunately we didn’t see any light show that night but that was due to the weather not the tour. We did have a great BBQ on the beach and the warming hot chocolate was much appreciated! In hindsight I might have booked with the Arctic Guide Service who were right behind the Radisson Blu Hotel and were extremely helpful in assisting me read the weather updates and giving hints on where to chase to get the best chances of a sighting.
You can also go on Dog Sled Tours that also hope to see the lights as well but I am not sure how much serious photography can be done and how much say you get in where the dogs go. Cars and buses travel faster and can cover more ground!
CAR HIRE
I decided before I left the UK that I would do one tour on the first night and get to know the lie of the land. I would then hire a car for the remainder of the stay. The cost was unusually low for Norway when compared to going on a tour each night and meant I could go where I wanted, when I wanted and for as long as I wanted. Four days rental cost £132 with Hertz (who seemed a lot cheaper than others) for a Golf equivalent car (Toyota Auris inc. a very valuable factory fitted Sat Nav). Petrol for the four days totalled a further £70 and boy did I cover some miles!
I think all cars come with studded winter tyres as standard and this makes driving on the snow and ice covered roads a breeze. I have no particular experience of driving in these conditions and the roads (I was told) were at their most ‘dangerous’ due to melted snow turning to water and then freezing again to ice. However, despite this, I never had a ‘moment’ at all and given I traversed mountains and many many miles surely gives testament to the grip the tyres provide. Of course I drove steadily with smooth everything, acceleration, braking and steering but don’t be afraid. Having a car gives you much more freedom and much more time viewing, at a pace you decide, than a tour does.
HOW DO YOU SEE THE AURORA?
I am not going to get all sciencey here but it does help to have a few bits of basic knowledge and understanding of when the Northern Lights are on show and what factors need to be in place for the best displays. I may have some of this wrong but hopefully it will give you an idea on what to look for. Conditions tend to change VERY quickly and are notoriously unpredictable. This is what I learned and some of the resources I used whilst in Tromso.
Essentially you need three things to see the lights:
- Sun spot activity
- The right magnetic field conditions
- No cloud cover!
Resources I found helpful were these two main sites. Space Weather and Norway Met Institute With Space Weather, the important info is down the left hand side of the page. Firstly, read it a few times and click on the ‘more data’ buttons to see graphs etc. From the top left:
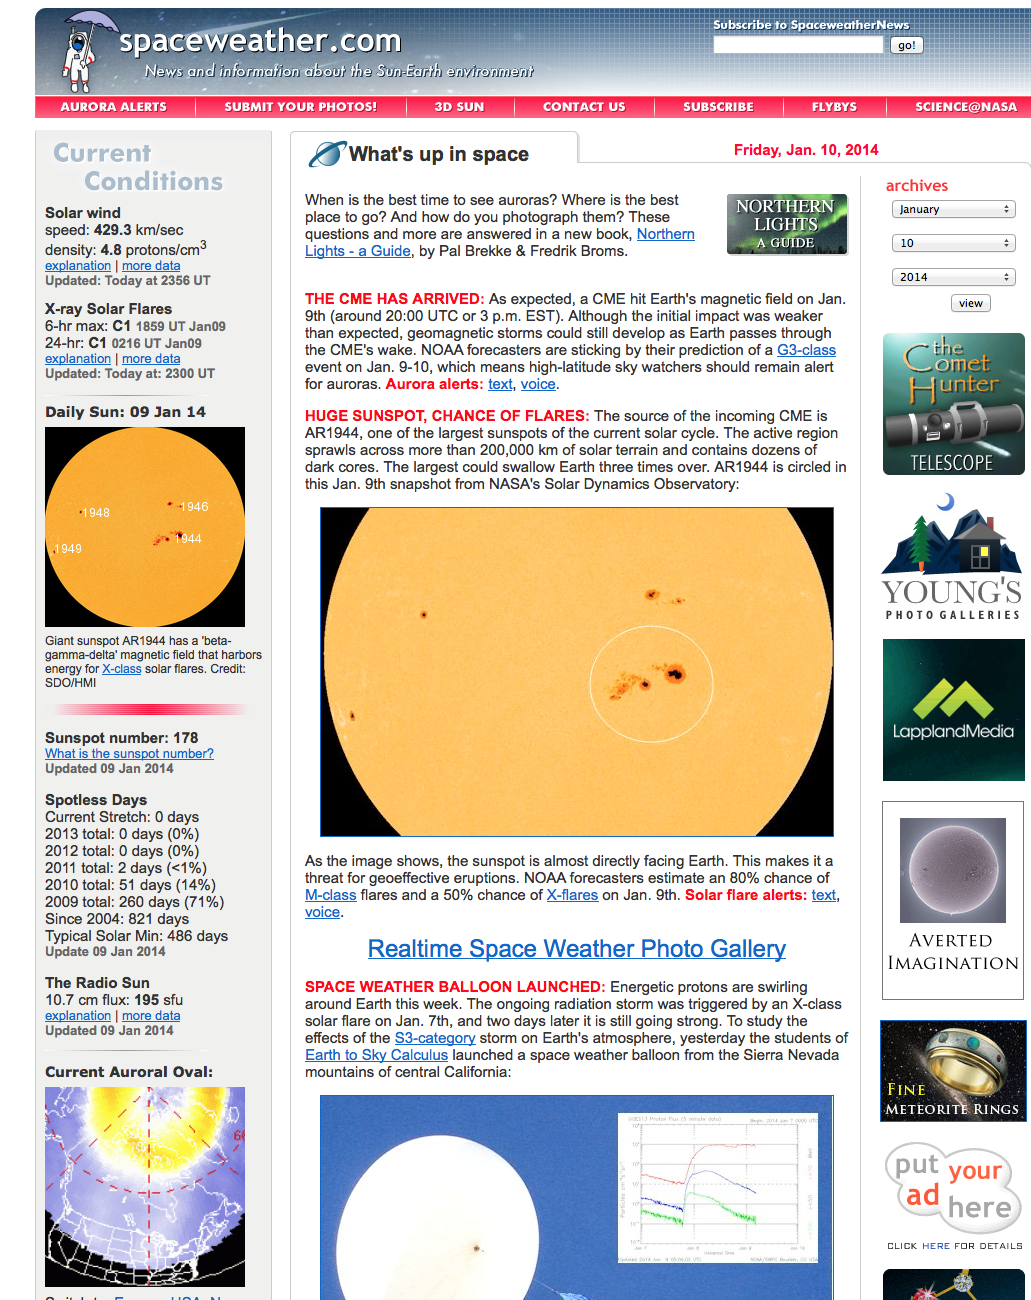
‘Solar Wind’ is important because it tells you the strength of the wind. The higher the number, the greater the strength, the better the potential Aurora. The info at the top regarding the sun spots is also crucial, here taken as a snapshot of the site from around midnight 10th Jan 2014 there has just been a “Coronal Mass Ejection” (CME) from a large sun spot. These cause the magnetic storms that can result in very good Aurora displays. Don’t worry however, activity was pretty quiet when I was there and I saw the lights on every day the weather was clear!
The other details down the left hand side also help in predicting the auroras likelihood:

The map (‘Current Auroral Oval’) above left, here of Europe, shows the band of aurora and its likely reach. In this case, unusually stretching down into even the mid UK due to the CME earlier in the week. We were also told that Auroras were more likely to be better if the ‘Interplanetary magnetic field’ was south rather than north. This has something to do with a blocking effect if it is north. However, this data is only historical and changes quickly. If you click the ‘more data’ button under the current readings you will see a graph showing a line that seems to dip south and north fairly frequently.

Although hard to see, the 2nd graph here (Bz) shows that over the past 24 hours, the magnetic field (Bz) was mostly getting tugged north (above the line) but it did have periods where it dipped under between 1-3am for example.
The Norway Met Institute is the weather site that all the tour guides use to try to get the best idea of where to head for the evening for clear skies. It gets updated at around 5pm so wait until then to make a decision on where to go. Basically, the Aurora could be putting on a fantastic display but if you can’t see it due to cloud cover, you will be disappointed. Short of hiring a plane, study this site for the best location to head. Sometimes it is better to get away from the coast and head south, other times north. The forecasters do try to be VERY localised so you can search the site for very specific locations. The main locations I searched were Sommaroy, Hansnes and Tromvik to the North and Skibotn and Skjold to the South. The site is really simple to use. Type in the name of the place you want info on and then on the left hand side click the ‘Hour by Hour’ button and then (again on the left) the ‘Detailed’ button. It should look something like this:

The top graph is the crucial one in that it shows the likely cloud cover. In this case, virtually none! If there is any then below the top graph is a detail of likely high, mid and low cloud forecasted. Now, this is a weather forecast and on one night I was there, the site showed thick cloud all night. We decided to head south and never saw a cloud in the sky at all so remember it is only a guide. Importantly, it is there to give an idea of what the conditions are likely to be. Given the activity of the CME and the clear skies around at time of writing, I wish I was back there right now!!! Do your research, make your decision and head to your location. Staying in Tromso is generally not an option due to the light pollution from the city.
LOCAL ‘HOT’ VIEWING AREAS
One of the things I was frustrated by when booking the trip was that I couldn’t find any information on where to drive to best see the lights when I got there. So here is a brief and quick summary of what I learned while there on the all important where to go. I not only wanted to get to see the lights but also wanted to find good locations that were ‘scenic’ and help my compositions when and if I got to take some shots!
As hinted at above, the general areas to look for that are within a good drive are these:
- Sommaroy (1hr 10mins)
- Tromvik (1hr 5mins)
- Hansnes (1hr 10mins)
- Skibotn (1hr 45mins)
- Skjold (1hr 45mins)
- Finnish Border (2hrs 10mins)
Now, remember, to get a good look at the Aurora, you need minimum light pollution so try to get as far away from Tromso as possible. Heading north is good as the ocean tends not to have too much light pollution(!), head south and the ‘Tromso Glow’ remains for many many miles and does show up in your images. The image below is slightly enhanced but is looking south from Sommaroy to the north and shows the level of light given off by Tromso to the south.

If you head North then there are a good number of beaches and backdrops of mountains to enable you to grab a good composition. The bonus being they are not too far from the road making falling into deep snow drifts less of a risk! A good spot near Sommaroy is a lay-by on the right hand side, just before the bridge over to the island itself. It has a good beach and a view over the bridge itself if required. Keep going to Hillesoy island a few miles to this point (shown as ‘A’ below) and walk up a small hill for a great view looking North. However, be prepared for windy tripod toppling gusts of wind up here!
Photography point on Hillesoy:

Heading south to any of the areas listed above and there are plenty of stop off points. The E8 road can get busy in the early evening but the E6 nearer Skibotn seemed less busy to me. Nothing worse (as happened to me) than having to wait for passing traffic to take your exposures just when the lights are at their best! However, it is easy to walk off the road toward a Fjord and reduce this problem. A great little tip we got whilst there was to take an alternative road back to Tromso from Skibotn/Nordkjosbotn via a coastal route. This affords great views over the Fjord and has many places to stop along the route.
Turn off the E8 and follow the left hand coast road. It adds time and miles but is a much more scenic route:

Further to the south around Skjold is are more forests which give the chance to show the lights around trees and mountains rather than water.
Obviously there are many other places to take wonderful photographs virtually anywhere in this part of Norway which is what I now realise is the reason why I probably couldn’t find any specific recommendations. I am trying to give some guidance to provide an idea and understanding to new visitors of general areas to DIY and hire your own car for a more relaxed and photographic study of the lights.
CAMERA SETTINGS (the important bit!)
I have a full frame DSLR that has good high ISO performance. I like to shoot in RAW mode and post process my images using Lightroom and Photoshop. Here were my approximate settings for my shots.
- Camera set to ‘Manual’
- ISO set between 1600 and 3200
- Shutter Speed between 8 and 20 secs
- Lens Focus set to ‘Manual’ (MF)
- Focus set to ‘∞’ (Infinity) Check in daylight where your lens focuses infinity, it may not be fully to the right! TIP: keep checking you haven’t nudged the focus ring off its setting as it’s easy to do as you constantly alter shutter settings, tripod levelling and overall position and the biggie, get in and out of your car
- f stop as wide as it will go: f2.8 (or faster) lenses are better but my f4 seemed to work fine
- Use as wide an angle lens as you can (not fisheye although it might be kinda cool!) I found my 24mm sometimes wasn’t wide enough! The lights can stretch from horizon to horizon. I therefore used a 17-40mm f4 lens at 17mm often
- Experiment with exposure times as each location throws up quite different conditions. The shorter the exposure the better as you can get good definition of the Aurora otherwise it can get a bit ‘mushy’ with the lights just looking a like a lump of green!
POST PROCESSING
Remarkably, very little is required. In a RAW convertor, a tweak in Clarity, a touch on exposure if needed and maybe a slight brightening of shadows to ‘lift’ the surrounding landscape more than anything. It can be tempting to push the saturation slider up but as soon as this is done it all tends to look a bit ‘false’. Its all down to personal preference so experiment away.
IMPORTANT BITS NOBODY TELLS YOU
1. The Aurora can be very hard to see with the naked eye! This is due (I am told) to our eyesight relying on cones and rods for day and night vision. Our night vision relies on rods that predominantly pick up black and white light. Therefore the aurora doesn’t look anything like the greens you see on photographs. TIP: Take exposures of the sky at regular intervals as I found the LCD screen showed me far better when the lights were ‘on’ than my eyes could see. My first sighting of the lights was done by taking a picture of a sky that I thought had some light cloud in the distance. I was shocked when my rear screen showed this!

2. The lights don’t always show up in the north. We found it was more often displaying in a westerly direction but apparently they can appear pretty much anywhere so keep your eyes and lenses peeled and ready!
3. It is not necessarily that cold in and around Tromso. In general terms, it tends to sit under the jet stream and so temperatures range between -5 and +5 degrees C. Further south around Skjold in the mountains I experienced temps of -15C with a strong wind and believe me, that was cold! As you are likely standing around for long periods of time it goes without saying that thermals, thick clothing and good snow wear come highly recommended. A hot flask of your fave beverage also helps lift wilting spirits! Good gloves are essential and I could have done with better gloves that enabled me to operate my camera and keep gloves on. A good hat is important as the wind can get up especially in the coastal areas cooling the head and face very quickly indeed.
4. The sun doesn’t rise in Tromso from the end of November to the middle of January. This is great for Aurora photographers however the show can occur anytime from 7pm in the evening to 3am in the morning.
5. Although the sun never actually rises, it does ‘nearly’ rise and therefore there is a kind of dawn followed very quickly by a dusk period that can be quite beautiful for photographers. The light is kinda blue and very pleasant. A few weeks later in the year (late Jan to March) and there would be some very good landscaping shots on offer to say the least.
Kinda Blue?

6. February to March would be a good time of year to visit as there is some sunlight and the area is beautiful regardless of the aurora so photographers should not be stuck for landscaping opportunities.
7. The Aurora Borealis ‘season’ is anywhere between September and April.
CONCLUSION
Many people have seeing the Northern Lights on their bucket list of things to do. I did and seeing them has simply meant I want to go straight back and see them again. They are as magical and beautiful as you are led to believe. Whilst any break to Scandinavia is likely to be a fairly costly exercise, it is well worth every penny and I don’t begrudge it at all. The north of Norway is a beautiful country with lovely people and I would thoroughly recommend it as a destination regardless of the lights and photography. Combine all of those things and it really is a photographers dream come true. I can’t wait for my return visit!
I leave you with a couple more images of the lights taken while I was there.


